Friday, December 16, 2011

Hi everyone. I hope you are enjoying the hop.  You should have come from Charlotte's blog.  www.stampingismytherapy.blogspot.com  Doesn't she do great work?  She lives really close to where I live but I have never gotten to meet her.  Maybe someday we can meet for lunch or something.


I am so excited about Christmas.  There has been lots of fun and excitement at the Rogers' house. First and most importantly is Roscoe (the swap eating dog) got a bath!!  Dad had to give it since mom had to go to work and make doggy biscuit money, tee hee.  Isn't that so sad I didn't get to help.  We have my dad, my sister and niece and nephews coming over on December 23 then DH's kids coming over on Christmas Eve.  Christmas Day is going to be spent with just DH and I celebrating the birth of our Lord together.  Roscoe will be there too.

The house is mostly finished decorating except for some things on the walls.  I usually hang a ribbon around the walls of the living room and dining room.  Then I put all the cards I have received this year and the special ones that I have received in years past.  My BFF Patrice has a number of cards up on the Wall of Christmas Fame.The two she sent me this year are no exception to the rule.  They are just great.  She is so talented!


This blog hop is about winter holiday or winter decorations for the house.  I am still very much in the mood to do Christmas stuff.  I usually am still in the mood to make decorations and presents through the end of January.  Since I need more decorations this year I decided to make a Christmas banner that says NOEL.  I made the letters out of the Red Glimmer paper.  You can also change it up and have a celebration for your friend LEON or use it for your child's first birthday (ONE).  Stampin' Up! came to the rescue with all I wanted to use to make everything great.


This is a picture of my banner that is above my Santa Claus table in the front entrance hallway.  Notice the Santa right in front of the antique thread spool on the right of the Santa holding the Christmas cards?  Roscoe has adopted that one this year.  He has taken it down 4 times.  Twice I found it on his bed.  Once dad saw it in Roscoe's mouth as Roscoe was on his way outside and once I saw him just starting to take it down.  I finally moved it up to the top of the book case where he can't get it.  I just moved this Santa back here for the picture.  FYI I also made the Santa mail box and the snowman and tree on a chalk board.  This was in my "I think I want to do decorative painting stuff" phase that lasted the one class I made these.


Mr. Big Shot, Perfect Penant Biz Dies, Simple Letters Alphabet Dies and some of the great embossing folders got a work out with this decoration.  Thanks heavens for Mr. Big Shot.  He makes everything so much easier.  I love how everything coordinates.  SU has taken the guess work out of everything going together.  They even tell you what colors go with the DSP.  I used the Chocolate Chip, Wild Wasabi, Very Vanilla, Real Red and Winter Cobbler cardstock. 


OK, I am going to ask a question and see who guesses the answer. I'll give the answer at the end of the blog.  Look at the Cherry Cobbler Rose.  What did I use to make the Rose?  It will probably surprise you. 


Back to the description.  I used the Holly Berry Bouquet Designer Series Paper (DSP) with the coordinating buttons for the Rosette Banner.  


There is a coordinating Pines and Poinsettias stamp set with this DSP.  You can see it on the background of this banner. 


Did you see that cute green wreath and the holly and berry?  That is made with our Winter Wishes Stitched Felt that is in the Holiday Mini Catalog.  Can you believe that catalog is only available through January 3?


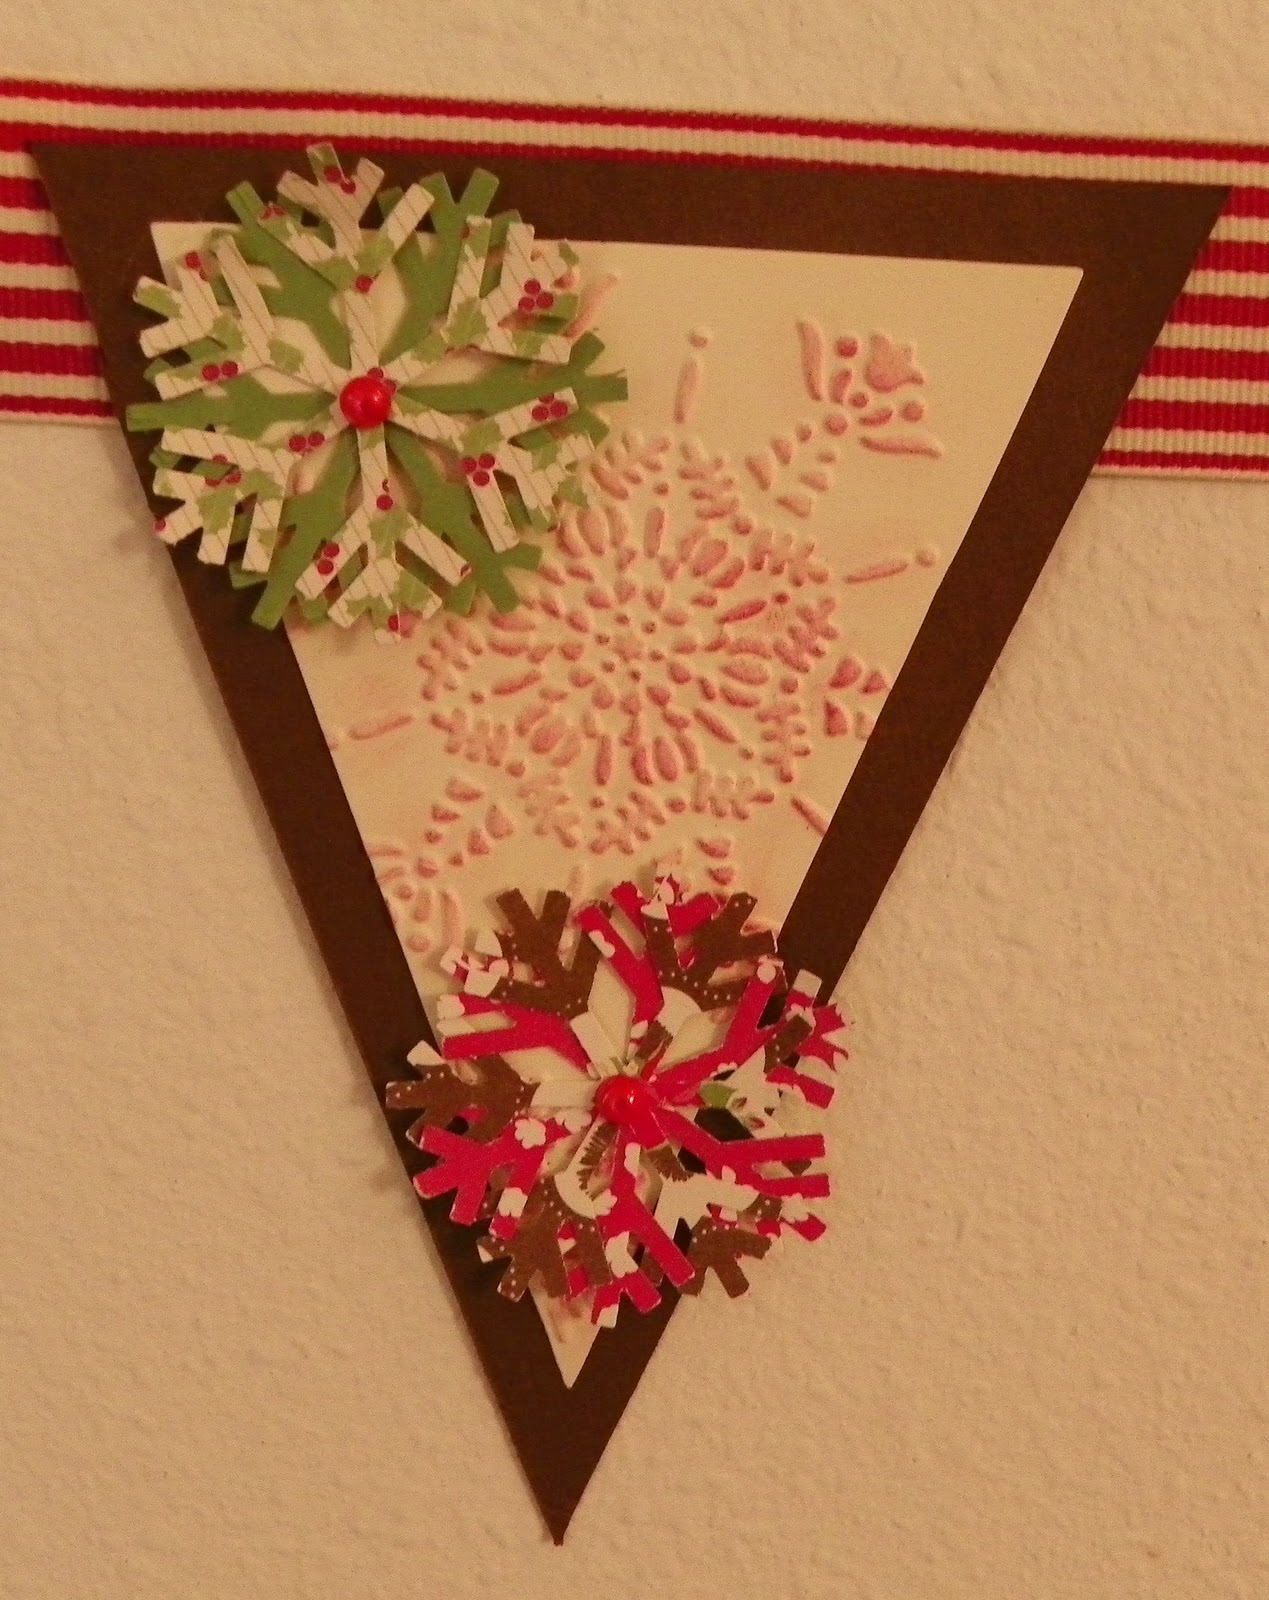
With this next banner I used my embossing folder with snowflakes, sponged Real Red ink on top of it.  Then I punched snowflakes and put two coordinating papers together.  The red dot on top of the snowflakes is one of our great pearls that are colored with a red permanent marker.


OK now it is time to reveal the answer to my question.  Did you guess the Owl Builder punch was used to make the rose?  I got the idea from Valita's Designs Fresh Folds. http://valitasfreshfolds.blogspot.com   Just go to her blog and see what she has done with these.

I hope you have a wonderful and special holiday season.  I am sending you hugs and Roscoe is sending you licks.  Now you will go on to the great Shari's blog.  http://sharisstamppad.blogspot.com  If you get lost here is the home page of the SU STARS http://su-stars.blogspot.com

Monday, November 21, 2011

The Blog Candy Winner and Other Things

Thank you everyone for visiting my blog.  I really appreciate all of your comments.   There were 29 posts out of over 500 visits.  The winner of my candy was lucky 13.
Anonymous said... Great idea adding a pocket to the step card, I will be doing that - thanks for the idea. Love the simply sent box, very clever and cute! Janice Heighway
 
Janice please send me your email and snail mail addy.  I know you were a Rocker but I want to be sure your info that is on the Rockers RAK Database is still the same as this summer.  My email is the same so that is where to send the info.
 
I had a lot of questions about how I did the other projects so I will be posting instructions on how to do those.  Since this week is Thanksgiving I am not sure exactly when I will be posting the answers to all the questions.  Monday is my cleaning up the house, doing laundry, and cleaning the Tree House day.  I work Tuesday, Wednesday and Thursday nights from 7 PM till 7 AM.  Friday I will recover for a bit from working 3 nights in a row.  Then Saturday and Sunday I have family gatherings at two different  places and two different families.  I am really tired just reading all of this, aren't you?  So just keep looking at my blog for when I post the answers to these questions.  Thanks again for all the looking.  Have a wonderful Thanksgiving and please remember all the things that have blessed your life.
P.S.  I can't figure out why my blog looks like this and can't change it.  Oh well.

Friday, November 18, 2011

November 2011 SU Stars Blog Hop

Hi and here we go again.  You are on the SU Stars blog hop.  You may have come from Dawn's blog.  http://www.stampinatdawn.blogspot.com/  I love her work.  Don't worry if you are starting here because the hop makes a circle.  If you get lost here is the home page.  http://su-stars.blogspot.com/


I love this time of year and really enjoy wrapping all my gifts for special people with my fantastic Stampin' Up! stuff (you know how I love stuff).  Today besides showing you some great ideas I am going to give a tutorial on making a Center Step Gift Card Holder.  This was inspired by Dee Slater's blog.
You will need a piece of 4 1/4" x 12" cardstock (CS).  Put your CS in your Paper Cutter with the 4 1/4" at the top of your cutter.  Position CS so the 12" side is at the 1" mark on the cutter.  It would be as if you were going to cut off 1" but don't.  Cut a line from 1" to 6 1/2" using the blade guide.  Flip card to the other side and repeat.  I realize my picture shows to stop cutting at 6", I really meant 6 1/2".  Oops


Using your Simply Score place your CS with 12" at top where you began 1"cut on left.  Score at 1", 2", and 6 1/2" to where you made the cut.  Flip and do the same on other side only scoring to where you made the cut.  Now score all the way across at the 11" mark.


To fold this the right way make a mountain fold at 1", valley fold at 2" and mountain fold at 6 1/2".  Fold the one inch bottom piece that will be on the inside with a valley fold.  Tape this piece closed only on the left and right side to make the pocket.  This will be hold your gift card quite nicely.  When everything is closed you will smoosh the middle piece so it is folded.

Embossing on the side panels is a super easy way to decorate the Center Step card.  To do this weave the Embossing folder so the middle strip of the card is outside the folder.  Then close the folder.  Put it through the Mr. Big Shot.

 Decorate your card as you wish. Layer a 3/4" x 4" Designer Series Paper (DSP) on bottom panel and on the inside holder for your gift card.   The middle panel of the card has a piece of DSP that is 2" x 4 1/4".


Now I have some other ideas.  The first one uses our great lollis, rosettes or whatever you are calling them.  They are made with our Simply Scored tool.


This second one I made a box out of our Simply Sent Everyday Elegance kit.  I love them.


Blog Candy:  Please leave me a comment today with your favorite project here and I will send of my Center Step Gift Card Holders.  No, there won't be a gift card or $$ in it.  Yes, I know this is a cheap way to get comments on my blog but I love reading them.  

Now go on to Shelly's blog http://www.stampinandscrappingnews.com/  Wait till you see the great gift boxes she has made.  Thanks for visiting and come back to see me.

Friday, October 21, 2011

October 2011 Blog Hop: Holiday Hoopla

Welcome to the October SUStars blog hop.  I have some fun for you today.  This hop uses some of the new and great products from the Stampin' Up! Holiday Mini Catalog.  I chose to use the Warmest of Wishes Hostess stamp set.  I love this set because it uses my punches (I love my punches) with the stamps.  I made a Halloween treat box card and a Fall or Thanksgiving card.  Plus I got to use my new Simply Scored from the Mini Catty.  I love that and didn't even know I needed one.  How did I exist without one before? 


Let's get to it.  My inspiration for this box came from Splitcoast Stamper's tutorial by Melanie.  Here is the link if you are interested in learning more.  http://www.splitcoaststampers.com/resources/tutorials/treatboxcard/

With the card I used one of my favorite and versatile dies for Mr. Big Shot - Tags.  I also used the 1-3/4" Scalloped Circle punch.  The Design Series Paper (DSP) in the catalog is Pick Your Poison but this bad person didn't get it int time this year.  I used the DSP from last year which isn't available any longer.  The colors were Rich Razzleberry, Old Olive and Pumpkin Pie.  Besides the Warmest of Wishes stamp set from the Mini Catalog I also used Wicked Cool from the big Catty.  To make the window in the box to show the candy I used the Modern Label punch.  The tutorial will show you how to do this.

The card and box already cut with some paper.  This is the front of the card.


Here's the other side of the box.


This view is the card closed with the box not put together.

The box put together with the card on the right.


For the Owl's costume I made the skirt out 2 of the scalloped circle punched papers.

The scalloped circle punch scored with the Simply Scored from one side of the petal to the other.  Then I cut one petal and accordion folded it.                
The darling owl in her costume.


To make the owl's costume I first stamped her in  Rich Razzleberry on Whisper White and punched her out with the Owl Builder.  Then to make the mask and bag I stamped them in Rich Razzleberry on Pumpkin Pie paper and cut them out.  I  added some rhinestones to the sides of the mask.  To make the witch's hat and boots I stamped and embossed from the Wicked Cool stamp set using black embossing powder.  The moon behind her is the 1-3/4" circle punch of Pumpkin Pie and sponged the edges.


I bet you have been asking what do I put in the box portion.  I used Hershey's Nuggets.  My personal favorite is the extra creamy Milk Chocolate with toffee and almonds, mmmmm.  I cut my paper 1"x3" and wrapped it around the nugget.  I really wish I had the It's a Wrap Holidays stamp set from the Mini Catalog  but it didn't get here in time since I didn't order it in time (duh).

The finished product.


Isn't this card and box set great?  I am really excited about this and can't wait to make more for Christmas presents.  Do you think I should make this for all my co-workers at the hospital?  I think it would be a ball and I would only need to make about 40 of them. 

My next project was a card I made for a Fall/ Halloween card exchange.   It isn't the same exactly since I added a few things.  Of course, I got to use my Mr. Big Shot to make the impressions on the three papers. 

I used Basic Black CS and Cherry Cobbler CS to mat the wreath stamped in Early Espresso on Whisper White paper.  I punched it out first with a circle punch in the middle then the rest of the wreath with the large scalloped circle punch.  The leaves were colored with my Stampin' Write Markers in all the colors used as CS. 

Here are the particulars of the card. 
Cardstock:  Garden Green, More Mustard, Cajun Craze, Basic Black, Cherry Cobbler, and Whisper White
Punches:  1" circle, large 2-3/8" scalloped circle, scallop oval, and large oval
Textured Impressions Embossing Folder: Square Lattice, Vintage Wallpaper, and Perfect Polka Dots

I really enjoyed making these projects.  If you have any questions let me know.  Thanks for coming by.  The next blog on the hop is Janice's.  www.stampingwithjanice.com  There are 13 lucky blogs on this hop.  If you get lost go back to the SUStars home page. http://su-stars.blogspot.com  Thanks for stopping by and hugs to you from me and licks from Roscoe (the swap eating dog).

Monday, August 15, 2011

Lucky Winner of My Blog Hop

I can't believe the end of the blog hops have happened for the Rockers.  I have had so much fun doing this.  I guess I will need to just participate in other hops.  Now for the lucky winner.  I had 84 look at my page during the hop.  DH was asked to choose a number between 1 and 39 for all the comments that were left.  He has never looked at my blog (doesn't even know what a blog hop is).  He picked lucky number 1.

Shari said: I tell you hwhut, that is right purty.  

Woo hoo.  I promise I didn't prompt him or anything.  I guess I should use the thing other people use to  pick so it is completely random and no one can accuse me of playing favorites.  Some people use Random.org which I tried to look at this weekend.  I don't understand how to get it on my blog so I will be working on this for the next time I give away candy.  Anyway, congratulations Shari and I will be shipping your stuff out.  Ya'll have a great week and I will see you later.  I will be teaching a Rocker class next Monday and I need to get ready for it.  Roscoe says hi to everyone.

Friday, August 12, 2011

VC Rocks 4th and Final Blog Hop of the Summer

Hi!  I have the pleasure of being the first blog after the VC Rocks home base.  If you happen to get lost or there is a problem with a link go to the VC_Rocks home blog
The theme for this hop is Punches.  As you know Stampin’ Up has some fantastic punches with stamps to match.  I had a hard time deciding what to do.  In the end I made a little bulletin board for the Stamp Tree House to keep track of deadlines.  It really is very simple.  The hardest part was deciding what DSP to use.  This is what I used to make this great bulletin board.

Paper: Beyond the Garden DSP, Tangerine Tango, Melon Mambo, Daffodil Delight, Wild Wasabi, Whisper White
Ink: Melon Mambo, Wild Wasabi, Tangerine Tango
Stamp Sets: Clearly For You, Build A Blossom
Punches:  ¾” circle, Blossom Bouquet Triple Layer, Boho Blossoms, Butterfly, Bird Builder, Blossom Petals Builder
Accessories: Glue Dots, Mr. Big Shot, Vintage  Wallpaper Embossing Folder, Pearls, Brayer, Sticky Strip, Stampin’ Dimensionals, Multipurpose Liquid Glue , Cork, 16” ribbon in a color that coordinates

Emboss a piece of CS cut to 2” X 10” with the Big Shot using the Embossing Folder of your choice.  Currently my favorite is the Wallpaper.  Ink your brayer with the same color of ink as your CS and put it over the paper.  This helps the design pop.  (Fun and important thing to know- your brayer should be stored with the brayer up so it doesn’t touch anything.  Otherwise it will get flat where it is touching and won’t work correctly.)

On an 8” X 10” Artist Canvas you have gotten at a Big Box Craft store adhere a piece of 3 1/2” X 10” DSP of your choice using Sticky Strip.    Adhere the CS you just put through the Big Shot on the bottom of the Artist Canvas.  Cut a piece of cork with your scissors to 4” X 10”.  Place over the paper towards the bottom and adhere with Sticky Strip. 

Now you are ready to make your flowers.  I made one from the large petals and small petals of the Build A Blossom stamp set.  First ink the large petal with Melon Mambo and stamp with the second generation inking.  Make five of those.  Then stamp over this with the coordinating overlay in first generation inking.  Punch these out with the Blossom Petals Builder punch.  Do the same thing with 5 of the smaller petals.  Stamp a third generation inking circle and cut it out.  Adhere the large petals on a 1 ¼” circle by covering the circle with Multipurpose Liquid Glue.  The tips will all be in the middle with the petals right next to each other  Do the same with the smaller petals on a ¾” circle.  Attach the small and the large together with Stampin’ Dimensionals.  Bend the smaller petals up for more dimension.  Adhere the middle circle with another Stampin’ Dimensional .   I cut out a leaf with a piece of Wild Wasabi that had gone through the Big Shot with the Embossing Folder and put it at the bottom of the flower.

Flower using the Blossom Petals Builder punch and the stamp set

For the smaller flowers I just cut out various flowers with the stamps and mixed and matched.  I added more color to the paper by using stamps to pop them up more.
Flowers made with the Blossom Bouquet Triple Layer punch


 To make the Butterfly I stamped on a piece of Whisper White and made that my bottom piece.  On top of that I inked the edges of a plain piece of coordinating CS, bent the wings up and adhered with a Stampin’ Dimensional.  The Pearls gave it even more dimension.


For the stick pin flowers  I made various flowers and adhered them with a Glue Dot.   To hang this I made a hole on each end using my Cropodile.  I threaded 16" of ribbon from the back on each side and made a knot on the end.
My bulletin board for the Stamp Tree House


This is all super easy.  If you have any questions let me know.

 How about some BLOG CANDY!!  I will send you all the ingredients to make your own Bulletin Board!!  I have included the Artist Canvas, cork and some DSP with CS.  If you don’t care for the DSP I have included you can use your own.  Please leave me a comment about what you would use the bulletin board for.  My DH will pick a number and that person will win. I will post the winner on Monday and you can send me your email and snail addy.

I have enjoyed having you here today.  Now it is time to hop over to Linda's blog.  Have fun.

Monday, July 11, 2011

Blog Candy Winner from Hop #3

Congratulations lucky #11, you win the prize. 
Jackie L Watson said...
Gorgeous tree by the way, I just these, and your tutorial was as easy to follow as your card holders where to make. Thank you for sharing. I would use mine to send my awesome sister something special(can't tell she is a rocker too)! Jackie, I will be mailing out your very own gift card holder.  The Christmas tree will be your responsibility.  I have had a number of people ask if I put the tree up just for this post.  No, this was from last Christmas.  It was covered with about 15 different gift card holders.  Thanks to everyone that came and looked at my blog for the hop.  I am going to participate in the next VC_Rocker blog hop too. I am off to Salt Lake City tomorrow for the Stampin' Up! convention.  I will be coming home with lots of fun and new ideas.  Have a great week everyone.  Roscoe will be dogging the email if you have any questions.

Friday, July 8, 2011

VC_Rocker Blog Hop #3

Shari Dudek's blog

Welcome to the VC_Rocker Blog Hop #3.  If you are doing the hop you have just come from my great roomie at convention Shari Dudek's blog.  If you want to go back and take a look click on the button above that says previous.  Isn't she great?

I have had so much fun this year with the Rockers.  They are a great and very talented bunch of women.  I learn so much from them.  This month the theme for the blog hop is ABC which means Anything But a Card.  That leaves it pretty wide open.  When I was trying to figure out what to do I came across some pics I took of gift card holders from last Christmas.  I have nieces and nephews that are teenagers and they are very difficult to buy for Christmas.  I started giving gift cards a few years back and they don't seem to mind them.  This year I decorated our little tree with all of the cards that I made.  I took pics.

This one has our beautiful material that was offered in the Occasions Mini from 2010 and is available in the new catty!


I had a few others but I will save those for another time.  I decided to make a different kind for the blog hop.  I got the inspiration from the very talented Connie Babbert. It really is super easy to make and you can do it quickly.  Please forgive the pics- I am working on getting better with them.

Materials needed:
CS:  Baja Breeze, Old Olive, Not Quite Navy, Cherry Cobbler
DSP: Paisley Petals- this is so special IRL
Inks: Cherry Cobbler, Not Quite Navy 
Stamp set: Fabulous Florets
Punches: (have I told you how much I love my punches) 1" circle, 1 1/4" circle, 1 3/8" circle, 1 1/2" circle, Scallop circle
Various Accessories: Cherry Cobbler 1/2" Seam Binding Ribbon, Mr. Big Shot (my favorite), Two Tags Die, Sticky Strip, Stampin' Dimensionals, stapler

Cut CS in following sizes
Outside piece (aka sleeve) measurements: 4 X 5 1/2, score at 2 1/2 and 5
Designer Paper (aka DSP): 2 1/4 X 3 3/4
Inside piece measurement:  2 1/4 X 11


Step 1 Cut outside piece of CS and score.  Add Sticky Strip along the edge.  You have just made the sleeve.


Step 2 cut the DSP to the appropriate size.  Use the 1 1/4" circle punch halfway on one end.

Step 3 Adhere the DSP to front of sleeve, punch 1" circle in area of the DSP circle to layer.  Go ahead and tape the sleeve together with your sticky strip at this part.

Step 4 Fold the 2 1/4 X 11 in half and place the folded edge JUST above the perforations on the top of the Two Tags die.  The fold is going to be right below the end of the die so it won't be cut.  Use Mr. Big Shot to cut what will be the inside piece. 
Step 4 end product

Step 5 and Step 6

Staple the folded tag closed along the top of the scallop.  I did mine also along the bottom since my gift card kept falling out and I was afraid my nephews would lose their cards.

Step 6 decorate the front in the beautiful way you want.  I stamped the flower using the Cherry Cobbler ink on Whisper White, adhered it to a Old Olive circle then adhered it to a Not Quite Navy Scallop Circle. 


Make sure when you adhere the scallop circle to the folded tag to use Stampin' Dimensionals along the right side of the scallop.  You want the left side of the scallop to side over the sleeve.

Finish decorating the sleeve and the inner part.  I used a piece of Cherry Cobbler seam binding ribbon on the sleeve to make a pretty bow but you could put anything you want.  After you finish decorating the folded tag slide the folded tag inside of the sleeve with the Scallop overlapping.
Closed and completed gift card holder
Shown open with gift card DS gave me for my birthday added inside folded tag piece.
I had so much fun making this and will have to use it for a present for some special person.  I hope you had as much fun as I did. 

BLOG CANDY-  Yes, I decided after seeing what other people were doing that I have to post some.  How about one of these darling gift card holders?  Now I am leaving on Monday for my dad's to get to the airport for convention so I won't be sending it till next week  but if you want one of these leave a post telling me what you would put in it.  Be sure to leave your email addy or I can't get in touch with the winner.  No, you don't get the Christmas tree with it.

Click on the button below to be taken to the next blog with beautiful creations done by Ellen Kemper (aka Big E and Fearless Leader).  If you get lost just go back to vcrocks.blogspot.com


Tuesday, June 14, 2011

I have followers!!

OK, now that makes me have a responsibility to post every now and again.  Thanks guys for the kick in the behind to get me going.  Vickie and I went to a stamp convention in Collinsville, IL this weekend.  Granted it wasn't Stampin' Up! but I learned some tricks that can be used with cards that are.  It was on Sat and I got to meet someone that is in my VC_Rockers group (Hi Alicia).  Then we spent the night at my dad's house and went to one of Vickie's friends out almost to Troy, MO for a couple of classes.  Whew, it took us almost 2 hours to get there.  That's OK because I met some great crafters and got to play.

Anyway enough chit chat.  I have a creation that I have made that I can share with you today.


Did I ever show you what I made for a present last year and for a craft show?  No, I didn't think so.  This is made from roofing flash which is available at your local hardware store.  I bought a roll of it for about $13 and have enough to last for a very LONG time.  I got the inspiration for this candle holder from Monica Weaver's blog.  I cut the flashing (wearing gloves so I don't cut myself) with a pair of scissors.  I used Mr. Big Shot and the Flower Folds die from Stampin' Up!  I used the three smaller flowers to make this.  The two smallest flowers I used my Perfect Polka Dots embossing folder to make cute impressions.  The tea light was covered on the outside with Sticky Strip (I love that stuff) and rolled in Silver Chunky Essentials Stampin' Glitter which is going away at the end of the month.  To put the candle holder together I used a few Glue Dots in the middle and added the next layer.  I also used it to adhere the tea light.  You can adjust the petals of the flower any way you want to make it great.

I am thinking about using this for a swap in the VC_Rockers just not sure I have time to make it now.  I will be leaving to the Stampin' Up! convention on July 11 which is about 4 weeks from now.  There are a lot of things I want to complete before then.  Stay with me and I will try to post things.  Thanks for following me.  Please leave a comment so I know you are looking.

Monday, May 30, 2011

Challenge for Stamping 411: Saturday Sketch Challenge for 5/28/11

Today is Memorial Day in the US.  Thank you to all the service men and women that have served to keep me safe and free.

I am going to try and get back into doing this blog every once in a while.  VC_Rockers have blog hops and I need to be using this blog to be part of the hop.  I am really pretty shy about sharing my things with other people.  (Yes, I am technically shy- stop laughing). 

Anyway the Challenge for the VC_Rockers is to use three Regal colors, a brown, a current stamping set and 2 accessories.  I chose to use Soft Suede, Cajun Craze, More Mustard, Not Quite Navy colors.  For my stamp set I used Autumn Days which I love, love, love.  My accessories I used were 1/8" Taffeta Ribbon that I colored with my Not Quite Navy Stampin' Writer and a Build-A-Brad.  I have had these forever but never had the guts to use them.  The Sketch I used was for the Stamping 411 challenge.